The following is a guest post by Josh Rowley and originally appeared on his blog. Josh is currently a student a The Flatiron School. You can follow him on twitter here.

Testing let’s you check on the health of your code, making sure it’s performing well. Photo by Jeff Werner.
Up until today, all of my project work at Flatiron has been focused on writing application code. Today, I started learning about how to write the companion test suites. It’s a bit intimidating, so here’s how to get started.
Why Testing is Important
Writing test suites is important because it helps ensure that your program does what you think it does. Your tests define your expectations for your program. When you run your test suite, your tests should pass if your program’s behavior matches these expectations, and fail if the reality is different.
Testing becomes very powerful once you start coding using a test driven development approach. Rather than writing tests for your existing code, you write your tests before anything else. Define the expected behavior in the test, and then write the necessary code to get the test to pass. Once, the test is passing, refactor your code to remove repetition and improve code readability. As you continue to build a large collection of tests, your full test suite should warn you if new code starts to cause bugs somewhere else. These early warning flags help keep your code stable and minimize bugs.
What is Minitest?
Minitest is a lightweight testing library for Ruby. Minitest used to be a separate gem, but as of Ruby 1.9 it’s a part of the standard library that comes with Ruby. Require the library in any Ruby file and it adds all kinds of methods that make writing tests easier.
How to get started writing tests with Minitest?
For example, let’s say I’m writing a Flashcard class for an application for studying Spanish. Before writing any part of the Flashcard class, I’ll want to create tests for how I expect the Flashcard class to behave.
I’ll first create a file for my test suite, test.rb. Within this file, I’ll want to make sure that the Minitest library is loaded before the tests are run. This is done by requiring the library:

We’ll also want to load the file that will contain the code we’re testing. In the same directory, let’s say card.rb is where I’m going to start writing the class definition. I’ll load it in through the require relative method:

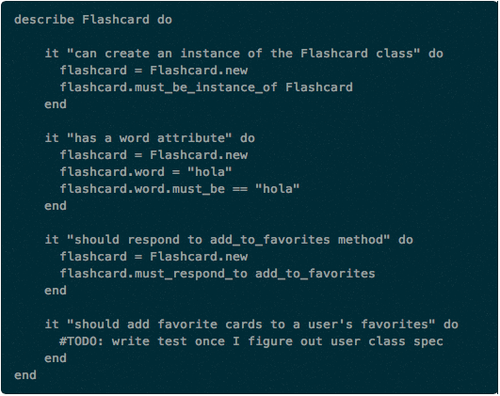
Now, I’ll write my tests. I should write tests for every expected behavior for the class. How do I write a test? Click on the block below to go through the process step by step.

Step 1: Use Mintest’s describe method to create a block where all your tests relating to the Flashcard class will go. All your tests will go between the do and the end keywords.

Step 2: Use the it method and pass in a string that describes the expected behavior. This will be the text that is printed when the test is failing to help you identify which functionality of your code is not behaving correctly. Be sure to pick a good name.

Step 3: Set up what needs to be in place before you make an assertion about the test. In this case, I’m testing whether I can create an instance of the Flashcard class, so I’ll want to set the stage by creating an instance.
Step 4: Write an assertion about the expected behavior. Minitest has easy to understand methods such as must_be_instance_ofthat determine whether your test passed (whether the assertion is true), or failed (assertion returned false).
Continue to write out all your expectations, until you have a sizeable list. Here are some example tests, you’ll probably have more tests than this, but note that there are tests are very basic stuff like whether the class even exists, up to whether the class adds a card into a user’s favorites.

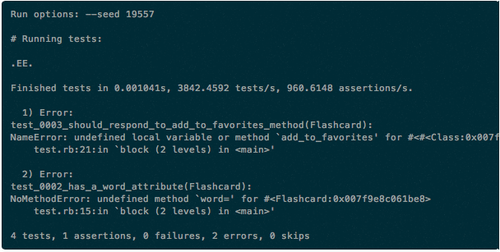
I run the tests by running the test file through Terminal: ruby test.rb. This is where a testing tool like Minitest comes in handy. The test file will print to the terminal any errors and whether the code from flashcard.rb passes the test. If it doesn’t pass, Minitest will print the actual value and the expected value that were inputted into that test’s assertion. When I run the above test suite, the first error I receive is:

My suite describes a class Flashcard, but Ruby can’t find the class. In accordance with a test driven approach, I now add code into flashcard.rb, but only enough to get rid of that first error. In this case, all I need to do is define the class in flashcard.rb:

Now if I run test.rb again, I get the following:

As you can see, Minitest creates a very readable format for you. Your next step is to tackle fixing the next failing test. What’s great about writing these tests is that it forces you to explicitly define what your application should do before you write the code. Sometimes, writing tests for one class will help you figure out what other classes you need. For example on the last test, I want to add cards to a user’s favorites. Obviously, I’ll need to now write tests for a User class, and then also eventually make some design decisions on how cards are added to a user.
Tests make you break the problem down into the smallest possible chunks, keep you focused on one small problem at a time, and help prevent feature creep and getting sidetracked. Plus, there’s an addictive reward you feel when you get a test to pass, even if it’s super basic, that’ll keep you motivated.


