Using Digital Ocean and Dokku for easier Rails app deploys
This post was written by Flatiron student Dan Visitainer and originally appeared on his blog. Check it out to learn more about Ruby and Dan’s journey to becoming a developer at the Flatiron School. Want to join Dan and hundreds of other students who have changed their career through code? Check out the Flatiron School’s upcoming courses near you. […]
This post was written by Flatiron student Dan Visitainer and originally appeared on his blog. Check it out to learn more about Ruby and Dan’s journey to becoming a developer at the Flatiron School. Want to join Dan and hundreds of other students who have changed their career through code? Check out the Flatiron School’s upcoming courses near you.
Heroku is a great service. You cannot knock it for its ease of use in deploying web apps in many of today’s popular programming languages.
Unfortunately, Heroku’s free packages aren’t without limits. For example, support for temporary file storage is really tricky. There’s also limited database storage.
Add all of these limitations together, and you may just wish you could host your app on your own server – there wouldn’t be any limits there! Now, setting up your own server requires a lot of technical elbow grease and know-how. And once you get that done, deploying your app is a whole other step. If only there was an easier way!
Thankfully, there is. Enter Dokku.
You say Heroku, I say Dokku
To give an extremely broad description of it, Dokku is a self-hosted Heroku. You can deploy your app using Git, just like Heroku, but you don’t have to deal with any of the limitations that come with free Heroku – since it’s running on your own server, the only limitations are those of your server.
Here, I’ll walk you through getting a Ruby on Rails application up and running with Dokku. We’ll use Digital Ocean for the servers. I’ll assume you already have a Rails app made, that uses Postgres for its database, and that you have a Digital Ocean account. I also recommend you already have a personalized domain name (applying a subdomain to your Dokku app will work fine as well).
1. Make your Droplet
Log into Digital Ocean and make a new Droplet. I recommend a droplet with at least 1GB of RAM (the $10/month one). Scroll down to the “Select Image” section, click the “Applications” tab, and select the “Dokku” image, like so:
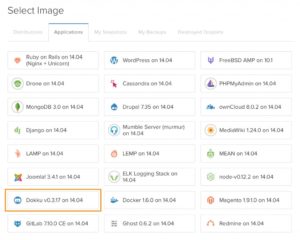
The Dokku image will give you a server droplet with Dokku pre-installed for you. Next, click “Create Droplet”.
The Dokku image will give you a server droplet with Dokku pre-installed for you. Next, click “Create Droplet”.
2. Add your SSH key to Dokku
Once your droplet is created, you’ll get an email from Digital Ocean with your droplet’s IP address. Navigate to it in your web browser. You’ll see this screen:
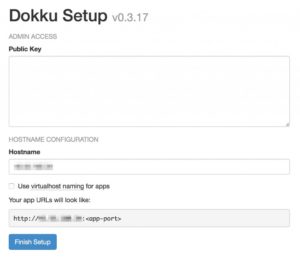
First, you’ll need to copy your computer’s public SSH key. Go to your terminal and run this:
$ ``cat /.``ssh``/idrsa``.pub
Copy what was printed and paste it into the text box labeled “Public Key”.
Next, type your domain name (without “www”) into the “Hostname” box.
I recommend you check “Use virtualhost naming for apps” – if you don’t, Dokku will generate a new port every time your app is booted. Click “Finish Setup.”
3. Add the Git remote
Next is to add the Git remote so we can deploy your app to your Dokku server. In your terminal, navigate to your app directory and run this:
$ git remote add dokku dokku@[server IP]:[app name]
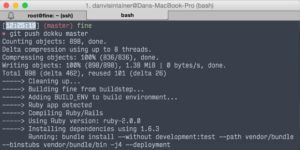
Make note of the name you placed after the colon. You can now push to Dokku, like so:
$ git push dokku master
If you’ve used Heroku before, you may find that Dokku’s output looks familiar:
4. Get your database working
If your app uses Postgres, you’ll need to set up your database on the server end. Let’s connect to your server with SSH. Go back to your droplet email from Digital Ocean, and make note of your server IP and root password. Then, head to your terminal and SSH to your server:
$ ``ssh root@[your server IP]
Next, we’ll install Postgres. Run these commands:
$ ``cd /var/lib/dokku/plugins
$ git clone https:``//github``.com``/Kloadut/dokku-pg-plugin postgresql
$ dokku plugins-``install
Your server may take a minute or two to run these. When it’s done, create your database:
$ dokku postgresql:create
This command will output some info, but you don’t actually need any of it. We’ll link the DB ourselves here:
$ dokku postgresql:link [your app name] [the database name you want]
Next, let’s migrate:
$ dokku run [your app name] rake:db migrate
And with that, your database is good to go.
5. Set your API keys if you have them
Finally, if your app uses API keys that are ignored with Git (perhaps you’re using figaro or something), they’ll need to be added to your environment on Dokku. Fortunately, this is easy to do.
In your terminal and while connected to your server with SSH, run this command to add an environment variable. If you’ve used Heroku before, it may look familiar:
$ dokku config:``set [your app name] TWITTER_KEY=ThisIsTotallyMyTwitterAPIKeySeriously738rh43723bd
6. Enjoy
That should be all you need to get your app working on Dokku! You can now enjoy easier, simpler deploys, automatically-installed Rails gems, with no database or file limitations to be found.
Want to become a Ruby expert like Dan? Learn more about Flatiron’s web development courses near you.
Disclaimer: The information in this blog is current as of May 18, 2015. Current policies, offerings, procedures, and programs may differ.