The following is a guest post by Iris Lee and originally appeared on her blog. Iris is currently in the Ruby-003 class at The Flatiron School. You can follow her on Twitter here.
What’s Capybara?

Capybara is basically a library that helps you test web applications by simulating how a real user would interact with your app.
Capybara requires Ruby 1.9.3 or later. To install, type in your terminal:

Capybara tests are often called feature tests or end-to-end testing. It was built on top of Nokogiri in order to discover the elements on a page using HTML and CSS. It is a DSL (Domain Specific Language) that is built on top of RSpec and Cucumber.
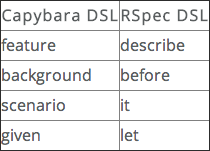
Capybara tests are like RSpec tests with Capybara flavoring (yum giant rodent). Some keywords:

Capybara uses a web driver (in this example Selenium) to do some browser magic. It lets you control the browser through code and has the browser take actions on your behalf in order to make sure the website actually works as the user will experience. Normally a “headless browser” is used to save memory, but the example below will show it to you live…for funsies.
Examples of Capybara syntax:

Capybara with Google and Youtube Searches.
You can download this code here.
Step 1
In your project folder, add Capybara and Selenium-WebDriver to your Gemfile. It should look like this:

Step 2
Don’t forget to bundle.

Step 3
Create a simple_app.rb file (it got mad at me if I didn’t include this file).

Step 4
Normally, there’d be more folders in your application, but this is a very simple example so everything is in the top level.
Your environment.rb should look like this:

Step 5
And your config.ru…

Step 6
Require Capybara in your spec_helper.rb file:

Step 7
Here’s what my features_spec.rb looks like. I’m using Capybara to search Google.com for “Flatiron School” and then visiting YouTube to look for cat videos. In each describe block, I tell Capybara to visit the website and fill in the text field with what I’m searching for and then click submit. The sleep 2 is there to slow down the process so you can see it better in Step 8.

Step 8
Now run rspec in your terminal and watch it do the searches and pass the tests.


